Everyone needs a folly... here is mine. (One of them anyway).
 I got interested in wood-fired brick ovens after having the roast
chicken at the Zuni Cafe in San Francisco,
the bread from the Bay Village Bakery in Pt. Reyes, the stuffed artichoke from
Cugini in Albany, and the pizza from Guillermo's in Oakland. Then
I found Alan Scott's
Ovencrafters
web site, and a couple of books (e.g.
The
Bread Builders ), sketched out some plans and started digging.
I got interested in wood-fired brick ovens after having the roast
chicken at the Zuni Cafe in San Francisco,
the bread from the Bay Village Bakery in Pt. Reyes, the stuffed artichoke from
Cugini in Albany, and the pizza from Guillermo's in Oakland. Then
I found Alan Scott's
Ovencrafters
web site, and a couple of books (e.g.
The
Bread Builders ), sketched out some plans and started digging.
I ended up building a backyard oven that anyone with basic construction savvy
could reproduce. I've include links to other websites,
a bibliography and all the fun things I wish I'd been able to find before
I started my project.
Here's the finished oven. Construction
pictures are below.
Please sign the guestbook! Say hi, ask questions.
Also, read the FAQ -- a list of questions from visitors and my answers.
More Construction sketches have been added.
I found an online discussion group devoted to brick ovens. Visit
groups.yahoo.com/group/brick-oven
and check out the "brick-oven" discussion group. (Note: If you decide to subscribe to the group,
be very careful to uncheck every box that lets Yahoo and their advertisers send you stuff, and don't
authorize them to release or show your email address).
The Brick Oven Project page is now a featured link
on the website of Secret Recipes, a popular Australian cooking show. Welcome, Secret Recipes fans! You may find my oven's corrugated iron roof
somewhat familiar!
[Back to top]
Books and Links
This section lists books that I found useful or interesting. Click on the
picture of the book to order a copy from Amazon.com
(If you live overseas and Amazon.com can't ship to you, you can buy The Bread
Builders directly from Alan Scott.
You might also check www.abebooks.com,
which is one of my favorite websites, for used and out-of-print books).
|
Your Brick Oven - Buliding it & Baking in it by Russell Jeavons. This
rather thin book gives a rather thin overview of the process of building and using
a homemade dome-shaped brick oven. I don't think
it presents enough information for a first-timer to confidently and successfully build an oven. If you want to build a dome oven and you're
new to brick-oven building, thoroughly digest the The Bread Builders
before attempting to build from this book. On the other hand, there are some good recipes, so it's a good addition to anyone's
brick oven library.
|

|
|
Bread Ovens of Quebec by Lise Boily-Blanchette and Jean-Francois
Blanchette. Another book I haven't seen but which Amazon says people like
us are buying... |


|
|
On Food and Cooking:
The Science and Lore of the Kitchen by Harold McGee.
Everything you ever wanted to know, or rather, everything you didn't
know you needed to know about the chemistry, history and science of food.
Ever wonder why Indian paneer cheese doesn't melt, or why yams cooked in a slow
oven are sweeter than yams cooked in a fast oven? It's all here, and it's fascinating. |


|
|
Special Edition Using Windows XP Home - Third Edition
A hugely valuable "how to use it" book about Microsoft's latest operating
system, written by authors who bring incredible experience, stunning
insight and unbelievable wit to a dry topic. If you buy only one
book in your entire life, this is the one to buy. (Disclaimer: I'm one of the authors)
|


|
[Back to top]
Pictures:
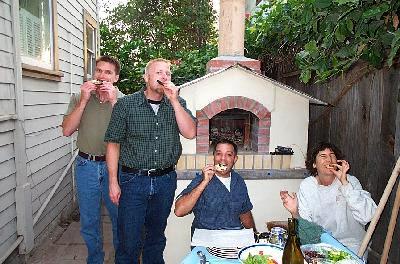
| First food! Four brave souls (Bruce, Pete, Holly and KC) came over knowing that with a
distinct chance of failure, we might end up having to eat at Liu's Kitchen up the street.
But the results were spectacular! We had six pizzas and a roasted chicken, salad and wine and,
it made all the work worthwhile. The pizzas were crisp and beautiful. The chicken was crisp and juicy and splattered fat all over the hearth and doorway bricks
(but who wants their oven to look new and unused, anyway?). The rosemary on top of it, um, caught fire.
|
|
| Yummmmmm! Happy people. Potatoes, Kalamata olives, capers and asiago. Feta, olives, basil and raddichio. Sausage, mushrooms and provolone. Eggplant and gruyere. There were others too. Finally Nutella (applied after baking).
The hearth was 750°F at the start and ended up at about 450°F.
I think 600°F is about ideal. The initial firing was short,
maybe an hour and a half, and pushed to the back kept things workable for over an hour of cooking. I'm really relieved at that.
90 minutes from start to first bite is very reasonable.
| 
|
| Stucco nearly finished (except for side near fence), starting on roof. I
waited several weeks for the mortar to harden before lighting the first small
fire, then progressively larger ones. A nice one-hour fire brought the hearth temperature to 560° and
the vault temp to 350°. That's getting toward pizza range!
| 
|
| Enclosed oven nearly finished & almost ready for stuccoing. I screwed chicken wire onto the
backer board walls to give the stucco something to grab onto.
|
|
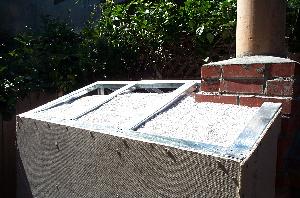
| Enclosure filled with pearlite (an expanded volcanic glass, sort of like mineral styrofoam).
Took 15 cu. ft. of the stuff - nearly all of four large sacks ordered from the nursery.
The sides are made of Hardibacker, a type of cement board (backer board) used behind tile bathroom walls, screwed
into the steel studs.
The enclosure needs to be fireproof and weatherproof.
| 
|
|
Detail of chimney cap (an inverted wok), with mocked up cardboard holder.
Ken Moeller did the welding to make the real thing -- thanks, Ken!
The terra-cotta flue pipe cost $2 at Urban Ore, our local salvage yard.
|
|
| Here the brickwork has been encased in concrete about 2 to 3 inches thick all around, to add strength
and retain heat. Lightweight and inexpensive steel 2x4 framing now surrounds the clad oven. Gave up on the idea of using vermiculite/cement
insulation and stuccoing that directly, I think it would be too fragile. Instead
I've built a rigid box around it with a tin roof. It'll look better too, I think. |
|
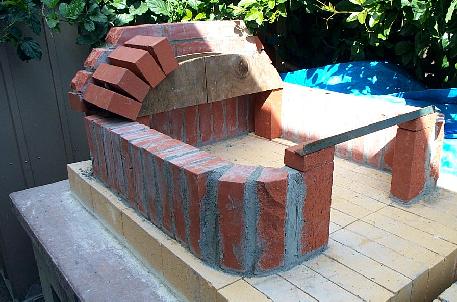
| Entry arch mocked up on its form. Here the oven vault itself is finished
except for the row of bricks angling down from the arch to the doorway.
Just got the idea of noodging the entry arch forward an inch this morning.
The back wall of the chimney will sit on the angled bricks and the front
wall on the entry arch. I think this will work, anyway. |
 |
| Front view showing the oven vault under construction. After the brick
vault, entry arch and chimney are finished, the brickwork will be encased
in 2" of concrete and four inches of vermiculite/cement insulation. Then
the oven and the block base will be stuccoed. |
 |
| Close-up of the brickwork under construction. The entry arch will be
built out from the doorway, out to the front edge, covering the ash slot.
I put a few bricks on the arch form to show its shape. Note: the angle iron shown at the doorway is not what I ended up using. The real support was wider and thicker. |
 |
I have more pictures. I'll try to scan them one of these days to make a more complete
construction pictorial. I added a sketch to the Construction
section.
[Back to top]
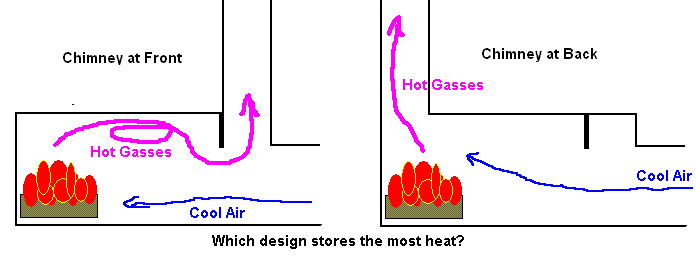
Stored Heat Masonry Oven Theory
Here's how a brick oven works for baking bread.
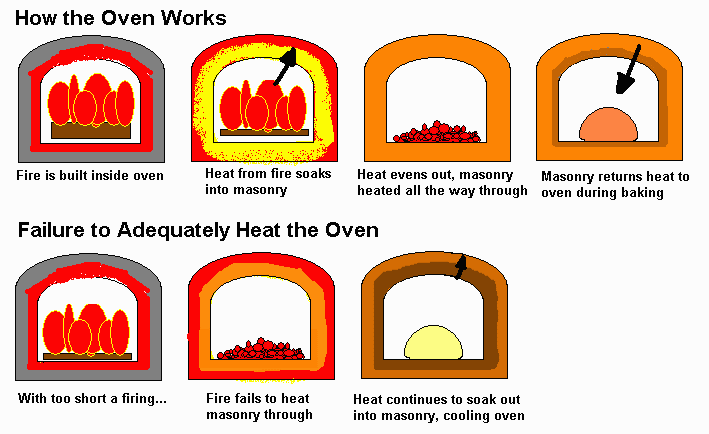
One question I'm asked frequently is: can we put the chimney in the back, or does
it have to be up front near the door? I'll give you a picture, and let you
figure the answer out yourself. The purple lines represent the path that the
flames, hot gasses and smoke from the fire -- which are what heat the oven for
us -- take getting out of the oven.
[Back to top]
Here I've posted many of the questions asked by visitors to this page, and my
attempts at answering them. I'll add to this section as more questions come in.
If you have a question not answered here or elsewhere on the page, please post a
message via the guestbook form that follows this FAQ.
- Can you post the plans you used?
Can you email me the plans you used?
How and where can I get directions for building?
- I built my oven using plans I derived from two books: Alan Scott's
The Bread Builders
and Tom Jaine's Building a Wood-Fired Oven For Bread & Pizza.
These are copyrighted, in-print books, so it wouldn't be right to post copies
of the actual plans. I do intend to post more detailed construction pictures,
though, to help illustrate the vaguer parts of the plans, and also to show
what I did differently..
- The bottom line is: buy a copy of
The Bread Builders, and/or visit the
Ovencrafters web site and buy a set of plans there. The book and plans are
well worth it so don't hesitate to get them.
- What are the dimensions of the oven opening (door)?
- It's 14 inches wide, and about 10 inches high. The picture just above
shows how the doorway was formed before the entry and chimney were
added.
- How do you heat the oven?
- A fire is built inside the oven, right on the bricks. I start a small fire
with newspaper and kindling and add slowly add larger pieces until the oven
is about half filled with firewood.The smoke comes out
the door and goes up the chimney. Once things get going the fire would burn
too fast if left to its own devices, so I block most of the doorway with a
row of bricks, to control the draft. The fire calms down and the load of
wood burns for an hour or two. I add more as necessary to keep it going
nicely.
Over a period of time (2 hours for pizza,
longer for bread), the brickwork and the concrete cladding around it absorb
heat. Then, for pizza the fire is pushed all the way to the back of the
oven, and for bread the coals and ashes are raked out. The floor of the oven
is cleaned of ashes by swabbing with a slightly damp rag stuck to the end of
a stick. During baking, heat flows back from the bricks into the oven
keeping it hot for many hours. The doorway of the oven can be closed off
with a wood and metal panel to hold in heat and moisture while baking bread
and meat -- see the sketch farther down the page. The doorway is left open
for pizzas to let the smoke and steam
out.
- What is the size (footprint and height) of your oven?
- Outside dimensions of the foundation slab are 52" wide and about
60" deep. The oven is about 4 1/2' high at the sides and 6' high at the
center, with the chimney cap about 9' or 10' off the ground. Inside, the
oven is about 24" wide and 30" deep give or take (I don't have the
measurements on hand right now).
- How much can you cook in it at once (and is the fire at the back)?
- I can cook two pizzas at once with the fire at the back.With the fire
raked out, I've cooked a roast, a pie and a pan of root vegetables all
together. I could probably fit in 9 loaves of bread.
- What kind of foods are cooked in the brick oven?
- Bread, pizza, meats, vegetables, pies, beans: anything you can roast in a
regular oven. The advantage of a brick oven is its ability to give you very
high heat (like 750ºF) without worrying about smoke or spattering. Spatters
just burn off next time you fire the oven! As the oven cools, you can bake
bread, pastries and beans, and if you want, even make some yogurt with the
last remnants of heat.
- How hot does the exterior of the oven get?
- Most of the outside stays cool. The warmest point is the face of the
chimney above the oven door, which gets very warm but not too hot to touch.
The very top of the metal roof gets warm after a few hours, but just warm.
Maybe 100°F?
- What kind of wood do you burn?
- I've been burning scrap lumber, pine or fir 2x4 or 4x4's cut to to fit in
the oven the long way. Hardwoods would be better. I'll get oak when I run
out of scrap. Never burn painted, stained or pressure-treated wood
in your oven.
-
- Is it necessary to use fire bricks in the oven or can you use common
bricks?
- Following Alan Scott's directions, I used firebrick for the hearth
(floor) of the oven and common red bricks for the rest. You can use
firebrick throughout if you wish. This is optional for home ovens,
probably necessary for commercial or frequently-used ovens.
-
- Did you use any type of special mortar?
In the oven and chimney, yes, I used a mixture of fireclay (called Builders
Clay down under), portland cement
and sand in the volume proportions recommended in The Bread Builders. This is
heat-resistant enough for occasional-use ovens. For a commercial or
daily-fired oven he recommends using alumina-based refractory mortars. These
are expensive and tricky. I used plain mason's mix for the cement block base.
Is this project beyond a mere
female?
No! Anyone with patience, plans and a good book on masonry from the
library should be able to manage it. The only time it involves heavy
lifting is when you pour the concrete foundation and the oven slab.
Hefting 80 pound sacks of concrete mix and shoveling the wet cement is
hard work. Regardless of gender, you'll want to have a couple of friends
help out for that part. All in all, it's pretty satisfying work.
How many bricks did it take?
Hmmm, that's a tough one. I'm going to have to get the photographs out and
count them! There are 70 firebricks on the hearth; I cut 12 more to make the
decorative row in the front, and I keep 4 on hand to stand in the doorway to
control the draft when firing the oven. I probably used 175 common red
bricks for the oven, entry and chimney.
What did it cost to build?
Again, I'm afraid I didn't keep good track. It probably cost about $750
US, including renting a small cement mixer twice and buying the tools I
needed. Besides the bricks I mentioned above, there are the equivalent of
about 45 8x16 cement blocks in the base, though I used several half-blocks
there. And there are probably 30 80 pound sacks of cement, eight bottles of
rust-color cement coloring, several sacks of mortar mix, one sack of
fireclay, one sack of portland cement, and several hundred pounds of sand.
The latter three are used to make heat resistant mortar for the oven proper.
Hmm, what else? Two sheets of 6 inch wire mesh, some rebar (I'll
post pictures of the rebar layout in the upper slab), and materials for the
frame: steel framing studs & cement fasteners, cement board & drywall screws, chicken wire,
stucco, and lots of pearlite.
How long does the oven hold its heat?
How hot does the inside of the oven get?
With a good two hour fire and a 20 minute rest with the fire in the back,
the center of the floor of the oven is at about 750ºF. After about 90
minutes of pizza party this is down to about 500ºF. I keep a fire going in
the back of the oven throughout. Lately I've been burning scrap lumber,
mostly 4x4 and 2x4 I picked up at a construction site, so it burns rather
quickly. Anyway, back to the question: you can bake pizzas for about
90 minutes. You can roast any kind of meat with heat to spare. I'd guess you
could bake two sets of bread loaves without refiring, either. With
the oven closed off by a wooden door, it holds heat well... it was about
200ºF the morning after a pizza party.
How hard was it and where did you get the plans?
I had no prior experience with masonry whatsoever, and I had no trouble with
this. One nice thing is that most of the brickwork isn't visible! And by the
time you get to the parts that are visible (the doorway, for instance), you'll
have enough experience to do a passable job. I recommend getting a good book
on masonry work from the library. I found one in my town, published in the
1950's. Nothing's changed since then, so that was good enough. And I got the
plans from Alan Scott's book, which I showed at the beginning of this page.
Can we put the chimney in the back of the oven?
No, you want only one opening in your oven: the doorway. The reason is
that you want the heat from the fire to soak into the bricks to heat them, and
if the hot gasses and flames go straight up the chimney, you'll lose all of
their heat. See the diagram in the preceding section for a visual explanation.
Instead of stucco (which is nice) could you finish the outside in
brick?
Yes, you can finish the oven any way that pleases you and fits into your
environment, as long as it's fire and heatproof. The Bread Builders
shows several of Alan Scott's ovens, finished various ways with brick and
stone. They're just beautiful. I used stucco because I wanted it to be
lightweight and simple.
I'm still not sure about how to build the cement slab. What holds it
up?
The oven slab (the one in midair) sits on the cement block base. It's
reinforced with rebar. The largest unsupported area is about 2' by 2'. It's
really not a problem. The slab was cast in place. I built form edging around the cement
block base, cut plywood to fit the large open spaces in the block base and supported them
from below, and covered the block cores with expanded metal lath (mesh). When the concrete
was cured, I pulled the plywood out from below. I'll post pictures of this
part of the construction soon. It was pretty fun.
Now that you built it, is the size adequate for your purposes?
Well, just barely. It could have been maybe 8" wider and deeper, but
I needed it to fit in my yard. I recommend that you build a mock-up with of
the oven floor and doorway before you build anything, and see
if your pizza and turkey pans fit!
How did you measure the temperature of the oven?
It's really handy to be able to measure your oven's hearth
temperature and to get an idea of how thoroughly its brickwork and cladding
are heated. To do this, you'll want to build small wires called Type-K
thermocouples into the oven's masonry. They generate a small electrical signal
proportional to temperature, which can be displayed by a thermocouple meter.
The thermocouples themselves are cheap, and it's so much easier to add them
during initial construction that I recommend that you build in several of them
even if you may never use them.
If you're going to be baking a lot of bread, I suggest that you build in
at least three thermocouples:
- one in the middle of the hearth, in a hole drilled up into a hearth brick
to within 1/2 inch of its surface and fixed in place with silicate furnace
cement, to measure hearth temperature,
- one halfway up the side of the arch
and halfway back, at the junction of the brick and cladding, to measure the
oven's stored heat,
-
one more at the same place but at the outer surface of the cladding, to
measure the thoroughness of heat storage.
For an oven used mostly for pizza, you might get by with just the one
hearth thermocouple.
Where do I get thermocouples?
I bought mine directly from Alan Scott -- view the Catalog page at
www.ovencrafters.net. Get them with at least 8 foot leads, so you can
position the meter wherever you like.
Aren't thermocouple readouts expensive?
You can buy fancy and expensive multi-channel temperature displays, but you
can also do it on the cheap for about US $45, using an inexpensive digital multimeter with a type K thermocouple input.
I've been trying to find a reliable and inexpensive one. I'll update this
section.when I have found one.
How was the chimney built?
The chimney is the vaguest part of Alan Scott's plans, and I had to figure
it out. Basically I set a terra-cotta flue pipe standing at the back on the
sloped row of bricks coming down from the oven arch, and at the front on the
entryway arch that you can see on the face of the oven. Then I built a
chimney around it about halfway up.I won't try to explain it in any more
detail; would take too long and probably would not help. I have pictures that
show what I did, I'll get them posted.
Do you really need a chimney?
You could omit the front entryway -- the tunnel and arch. However, I don't
recommend this. First, lots of smoke and flame come out of the oven during the
initial firing. Without the chimney, this would blacken the front of the oven
and would be a fire hazard. Also, as the oven heats, it cokes the wood and
the fire goes wild. You want a slow, even burn. The entryway lets you
moderate the fire by placing a row of bricks across the face of the entrance.
This limits the air supply while still letting the smoke go up the chimney.
Did you place mortar on the top of your oven, or is that just
vermiculite on top
The oven sides and arch (which you can see in the photos above) are
encased in about 3" of concrete top and sides, for strength and heat
storage. The space between the clad oven and the walls are filled with
pearlite, which is like vermiculite. I'll get some sketches posted which
will make this clearer.
Where to the ashes go?
There is a slot toward the front of the oven that goes through the
concrete slab into a space built into the concrete block base. You just rake
the ashes into the slot. Even if there are still glowing coals they'll
be fine down in the ash pit. The ash slot should be deep in the entry tunnel
about 2" in front of the doorway bricks & angle iron. I put my slot too far forward.
Not a functional problem but I have to worry about rainwater running in. The tricky
part is that you have to decide where the slot goes before you pour the hearth slab.
You make the slot by putting a piece of wood in the form to leave a void and
knock it out after the concrete is set.
Does the fire brick on the oven floor have grout?
No, the firebricks forming the hearth are set into a very thin layer of 50/50
fireclay and sand, per Alan Scott's instructions. Everything else is set
with heat-resistant mortar.
I'm afraid of building an oven and then having an uneven cooking
surface. I was told the inserts with the Italian ceramic bottoms
eliminated this problem.
The bricks are pretty darned even. When you set them into the clay/sand
paste, you press on them with a board to level them out. It works well
enough. At $750 for a homemade brick oven and well over $5000 for a factory-made
oven, I'll take the bricks, even or not. Besides, I think there's nothing
more charming than the faint impression of bricks on the bottom of a
crusty hearth-baked loaf. This can go too far, though.
From the Tom Jaine book that I mentioned earlier:
[In the Wiltshire village of Purton] Job Jenkins was loitering
in the churchyard when he had the brainwave to use the old
tombstones as a new floor for his oven. Quickly coming to an arrangement with
the parish clerk, he had the mason install them. To his horror, when he withdrew
the first batch of bread baked on the new floor, he found the mason had placed
the tombstones inscription uppermost so that instead of a baker's mark, each
loaf bore some phrase from the funerary inscription.
The words on every loaf were marked
That had on tombstone been,
One quartern had 'in memory of'
Another 'here to pine,'
The third 'departed from this life
At the age of ninety nine.'
I live in Hawaii. Where do I buy firebrick?
I never thought of it before, but I guess fireplaces aren't in great
demand in the tropics. You might check in the phonebook and call some
masons or construction companies to see where they get their supplies.
(NB: This visitor ordered his bricks from Shamrock Building Materials in San
Rafael, CA, where I had bought mine, and had them shipped to Hawaii).
It doesn't look like you added an insulation layer on the oven slab
or under it.
You're right, I skipped that step. In Alan's larger ovens he puts a
layer of foamy vermiculite/cement under the hearth slab and suspends the
slab off the block base for added insulation. Since I'm an occasional
and small-load baker, I'm not trying to get three bakes out of one
firing. I saw that Alan's smallest oven (in the set of plans I bought
from him) and the oven described in Tom Jaine's book omitted the slab
insulation and connected the slab directly to the base. So I felt it was
OK to do that. By the way, after a two hour firing and a 90 minute pizza
party, the bottom of the slab, which I can touch by reaching under the
wood storage area of the base, is hot to the touch, but not scorching.
I was wondering which plans did you use - ordered plans or from a
book?
I mostly used the plans from the oven in The Bread Builders,
but I scaled it down by about 8" in width and 12" in depth.
I felt comfortable doing this because I had ordered plans and looked
at the Jaine book, and saw that everything was pretty much the same
regardless of size (except for the bit about the insulated base, which
I mentioned in the previous answer). You could get away with just The
Bread Builders. On the other hand, getting that book plus the
Jaine book plus a set of Alan's plans won't set you back much relative
to the cost of the oven.
Why can't the rebar slab serve as your oven floor?
Concrete loses its strength when it gets hot and the strength doesn't come back
when the concrete cools.
So, building a fire right on concrete is a bad idea. Bricks are made
to take the heat.
I need sources/leads for materials.
I bought almost everything at Home Depot. (Helpful note: you can put
40 bricks in the trunk of a Saturn). Any building supply place should
have everything you need. Firebricks can be trickier, you may need to
hunt around for those. I had to drive 20 miles. Look in the yellow
pages under Masonry Supplies. A place that sells firebricks can also
sell you mason's sand and fireclay in sacks, which are going to be of
better quality than what Home Depot sells. For the angle iron that
sits on the two doorway bricks and holds up the angled bricks slanting
down from the arch: look under Metals or Steel. You want a place that
sells construction steel. I was a little intimidated going into the steelyard
but they were helpful and friendly.
Where do I get an arch form?
You'll make it yourself. When you're ready to build the arch, you'll
measure the distance to be spanned and mark it out on a piece of
plywood. Then, you stand some bricks on edge on the sheet of wood and
figure out how many bricks you'll need to span the arch. You'll
arrange them as desired, trace the outline of the arch with a pencil,
then cut two copies with a scroll saw. The two wooden arches are
nailed to a piece of lumber that serves as a spacer. Voila.
Do you use one of those giant wooden spatulas to load and
unload the pizza?
Yes, it's actually called a peel. They come in wood and aluminum.
I have one of each and find the aluminum one a bit easier to use --
it's thinner. I found mine at East Bay Restaurant Supply (Oakland, CA)
for about $15. They come in several widths and handle lengths. A restaurant
supply company in a large city should carry them, or you might try
www.chefsfirst.com
(they don't list their aluminum peels on the website but you
might be able to write to them to ask for one. Also, check out the
pizza bubble popper!)
To use it, sprinkle the peel with cornmeal, place the pizza on it,
reach it into the oven, and yank the peel out with a snap. As in the parlor
trick of pulling a tablecloth off of a table, the pizza will stay behind
(as long as it hasn't sat too long on the peel and gotten stuck, in which case,
if no one's looking, you can scrape up the resulting disaster, roll it into
a ball, bake it and tell the guests it's cheese bread).
If all goes well, after a minute or two the dough will be set and you
can use the peel to pick the pizza back up again. You'll need to rotate the
pizza a couple of times during baking to cook it evenly -- the back side near
the fire cooks first.
Was it worth all the work in the end?
Absolutely! Get your copy of The Bread Builders, your bricks and
your building permit, and get going!
Back to top]
Guestbook
Please say hi, ask questions, say why you're interested in brick ovens, or
whatever!
[Back to top]
Construction
Here's an exploded-view sketch of my oven.

Cross section of oven and view of flue pipe setup


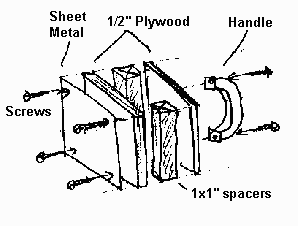
For baking, a wooden door seals the oven. Be sure that the screws are far enough in from the
edges of the door that they don't prevent it from making a good seal against the oven's doorway
bricks and angle iron.

[Back to top]
Recipes
Here's how I set up for a pizza party. You can, of course,
make it simpler or more complicated than this.
Here are the steps I go through:
- Early AM, make sponge (see instructions below)
- Shop for ingredients
- Prepare toppings (slicing, carmelizing, etc)
- 2 1/2 hours before pizza time, light fire
- Finish making dough, set aside to rise
- Clean up, put out snacks & drinks as guests arrive
- 20 minutes before pizza time: push coals to back of oven with hoe, remove ashes from oven floor with scuffle (a damp cloth through an eye hook on the end of a stick).
- Pizza time: prepare dough for guests to top, one at a time.
Dough Recipe
This recipe is adapted from the pizza dough recipe in the
Greens Cookbook. Quantities
are given to make 8 or 12 12" pizzas, enough to serve 8 or 12 people.
| Ingredients | For 8 | For 12 |
| Water, body temp | 1 1/2 c | 2 1/4 c |
| Sugar | 2 tsp | 3 tsp |
| Yeast, dry | 1 pkg | 1 1/2 pkg |
| Unbleached white flour | 1 1/2 c | 2 1/4 c |
| Milk, body temp | 1 1/2 c | 2 1/4 c |
| Olive oil | 1/2 c | 3/4 c |
| Salt | 2 tsp | 1 Tbl |
| Rye flour | 1/2 c | 3/4 c |
| Whole wheat flour | 1 c | 1 1/2 c |
| Unbleached white flour | 4 c | 5 1/2 c |
| Olive oil | 2 Tbl | 2 Tbl |
Steps:
- Sponge: Mix the water (warm but no warmer than body temperature), sugar and yeast
in a large bowl. Stir until creamy, then blend in the flour. Cover with plastic wrap
and leave at room temperature to ferment, at least 3 hours and up to 24 hours. (If 24 hours elapse,
refrigerate the sponge and let it return to room temperature before continuing).
- Beat in the warm milk, olive oil and salt. Add the rye and whole wheat flours, then
the unbleached flour. Stir until dough forms. If dough is very sticky, add more
unbleached flour as necessary. The dough should still be very moist.
- Turn onto a floured board or work surface and knead for 5 minutes.
- Form dough into a ball. Oil a large bowl with 2 Tbl olive oil. Put dough into bowl
and roll to coat with oil.
- Cover the bowl with a towel or platic wrap and set in a warm place (say, 80°F or 27°C)
to rise until double in bulk, about 60 minutes.
- Punch the dough down. Tear into 8 or 12 balls of equal size. Place the dough balls
on a parchment or plastic-wrap lined tray and bring out to the oven area, or cover tightly and
place in refrigerator until ready to cook.
Toppings
Here are the toppings and quantities that I recently set out for a dinner for 10 people:
| 1/2 | small japanese eggplant (a long, thin aubergine), peeled and thinly sliced
|
| 1/2 | small zucchini (courgette), thinly sliced
|
| 1 | medium red onion, sliced, soaked in warm water 5 minutes and drained
|
| 2 | medium yellow onions, peeled and thinly sliced, cooked slowly with some olive oil until carmelized (about 30 minutes)
|
| 6 | green onions (scallions), thinly sliced including some of the green
|
| 1 c | cherry tomatoes, sliced into thirds
|
| 1 | handful sun-dried tomatoes, refreshed in boiling water for 2 minutes, then drained, sliced, and marinated with some sliced garlic and extra virgin olive oil
|
| 12 | common mushrooms, raw, thinly sliced
|
| 6 | shiitaki mushrooms, sliced and briefly sauteed in butter
|
| 1/2 jar | roasted sweet red peppers, drained and sliced
|
| 1 ear | corn, raw, kernels sliced from the cob
|
| 2 c | basil leaves
|
| 2 c | arugula (rocket) leaves
|
| 1/2 | small head of radicchio leaves, core removed and torn into shreds
|
| 1/2 c | pine nuts (pignoli), toasted in a dry skillet to a light tan color
|
| 1 lb | fresh mozzarella or mozzarella di buffala (no substitute), in 1/4" thick slices
|
| 1/2 lb | smoked mozzarella or scamorza, sliced
|
| 1/2 lb | good quality mozzarella and/or provolone cheese, shredded
|
| 6 | thin slices prosciutto
|
| 1 c | roasted duck meat and sliced skin from a Chinese deli/BBQ
|
| 4 oz | goat cheese (chevre), broken into small bits
|
| 4 oz | blue cheese, crumbled
|
| 1 c | high-quality tomato pasta sauce from a jar, thinned with a few Tbl. water or red wine
|
| 1/2 c | Basil pesto (Pound 2 big handfuls basil leaves, 1 large garlic clove and 1/4 c olive oil into a paste in a mortar or blender, then add 1/4 c grated parmesan cheese)
|
| 1/2 c | Hoisin sauce (available in jars in Chinese markets)
|
| 1/2 c | extra virgin olive oil, with a brush
|
| | flour for rolling dough
|
| | corn meal to sprinkle on pans and peel before baking
|
As you can see, I go light on the cheese and meat. Only about half of this will end up on pizzas. The leftovers (excluding the cheeses and Hoisin sauce) go into a pot the next day to become an amazing pasta sauce.
Pizza Dinner
Besides pizza, you just need a large green salad, beverages and a dessert. You can make a fruit pie or galettes in the oven after the pizzas for dessert if you're feeling adventurous. For a pie, rake out the coals, put the pie on a metal baking pan, and close the oven up. I've cooked gallettes on a metal baking sheet with the coals still in the oven and the door open.
You'll need lots of room: room for all those toppings, room to roll out the dough, and room to assemble and cut pizzas.
You'll want the following accessories near the oven:
- Fireplace poker
- Scuffle (damp rag on a stick) to clean the floor before baking
- Several pizza pans, to build pizzas and receive cooked pizzas
- Pizza cutter wheel
- Peel (pizza-width spatula with a 3 foot handle)
- Container of flour
- Container of cornmeal
- Toppings
Some of my favorite combinations are:
- Tomato sauce, scamorza and prosciutto
- Tomato sauce, fresh mozzarella and basil
- Tomato sauce, red onions, pine nuts and blue cheese
- Hoisin sauce, duck meat, green onions and shredded mozzarella with duck skin on top
- Tomato sauce, goat cheese, sun dried tomatoes and pine nuts, topped with arugula after baking
- Pesto, corn and mushrooms
I like to let each guest top and share one pizza. The slices will seem small, but one pizza per person
will work out just right. The basic pizzamaking cycle is as follows.
| Host:
|
- Put one of the dough balls onto a floured board and roll with a rolling pin to about 12" in diameter. Roll from the center of the dough out. You can also stretch the dough by hand: rough it out with the rolling pin, then put your fists together, put the dough over your fists, and stretch the dough out from underneath with your knuckles (this will make sense when you try it!). Don't let the dough get thinner than 1/8".
- Sprinkle some corn meal onto a metal pizza pan and transfer the dough to the pan. Give the pan to a guest to decorate.
|
| Guest:
|
- Brush the dough with olive oil.
- If you're using tomato sauce, spread a scant few tablespoons thinly over the dough.
- Add toppings. Go easy, though. Thin pizza can't hold much weight.
My suggestion is to make each pizza very different. Choose just a few toppings so that the flavors will be distinct. That's the reason for the small amounts of a large number of items.
- Add cheese last, as it will hold the other ingredients onto the pizza. However, toppings that you want
to get crispy, such as the duck skin I mentioned earlier, can go over the cheese.
|
| Host:
|
- Sprinkle some corn meal on the peel. Hold the pan above the peel and tilt it downwards
to touch the peel. Hang onto the dough where it touches and slip the pan out from under the pizza. The pizza should drop onto the peel. Rearrange and reshape the pizza as necessary.
- Reach the peel into the oven and let its front edge touch the brick floor.
Snap the peel out from under the pizza.
- Leave the pizza alone for at least 30 seconds so that the bottom of the dough can set. Then, you can readjust its position. You must rotate the pizza a few times during baking, otherwise the back edge nearest the fire will burn.
- When the crust edges are a nice tan color, the pizza's done. Remove the pizza with the peel, slide it onto
a pizza pan or cake rack, and set it aside to cool.
- Roll out the next round of dough. Give it to another guest to decorate.
- Cut the cooled pizza into slices and give to the guest who decorated it.
|
| Guest:
|
- Pass your pizza around, extoling its virtues and subtleties, as you lobby for the vote
of "best pizza of the day."
|
| Tips:
|
- Toss a log into the back of the oven every now and then, to keep the a flame going. This helps cook the tops of the pizzas.
- Don't prepare the pizzas more than a minute or two ahead of baking them, or else they'll stick to the
pan and you'll have a mess on your hands.
- Don't get distracted! After few glasses of wine, it's easy to forget that there's a pizza in the oven,
but they can go from perfectly done to hopelessly burned in half a minute.
- If you want to be able to mix with your guests, hire or train someone else to
handle the dough and baking! It's a full-time job during the hour or so that pizzas
are being made.
|
[Back to top]
Construction Log
This is a bit embarrasing. It should have taken maybe five or six full weekends
to build this, but I managed to spread it out over two and a half years. Work and other things distracted
me, what can I say? It won't take you this long!
Late December 1998, dug out foundation
March 1999(?), built foundation forms. Poured foundation during torrential rainstorm.
May 1999, built cement-block base
July 1999, built formwork for upper slab & cut rebar
November 1999, poured upper slab
Dec 23, 1999. Got the firebrick for the hearth (floor
of the oven)
Jan 1, 2000. Finished laying the hearth. Lit a symbolic
"first fire" on the new hearth and mocked up the walls.
Feb 19, 2000. Put up the side walls of the oven vault
and the doorjamb bricks.
Apr 9, 2000. Finished back wall, built arch form.
May 20, 2000. Built the first arch. Not pretty, but it's
holding up.
June 17, 2000. Finished the three arches last week and
the doorway sides today. Built entry arch form.
July 2000. Finished the chimney & facing brickwork. Encased the oven in
concrete cladding
August 5-6, 2000. Built covering with steel studs, Hardibacker
cement board walls and corrugated iron roof. Filled box with perlite insulation.
Started stuccoing the base.
August 19, 2000. Nearly finished stucco. Started attaching corrugated metal roofing.
August 24, 2000. Painted stucco. Ken Moeller welded the wok and its support for the chimney cap.
August 26, 2000. First pizzas and chicken!!!
September 2000. Building a four-channel thermometer display, in progress.
June 2001. The oven is such a success that the side of the house is now the focal point
of the yard, so I had a patio put in. This cost about five times
what the oven cost.
Thanks to Brian Rude, Bruce Westland, Pete Cocke and Tom McGovern for
helping out along the way!
[Back to top]


